There are two ways you can create one of these - as in include or you can embed it into the document itself. If you want to create it as an include, then go to File/New/Code Page(Blank) to create a new, blank page. This Navigation Bar generator supports three states of buttons - normal, mouseover and the down state. The down state is also used as the normal button when the ASP check box is chosen.
The first screen comes up allows you to choose how many buttons are going to be in this Navigational Bar. Then, on the next screen, there are basically two areas of information you must choose and they are in order, top to bottom on the screen. Most are self explanatory, though they are listed here anyway:
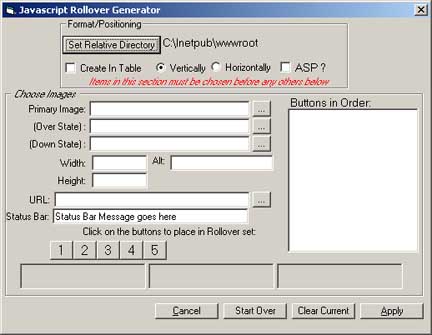
Format/Positioning
The 'Set Relative Directory' is there so you can choose the directory you want. All the coding is relative coding - NOT absolute. If you haven't saved the file already, you will need to choose the directory you want. If you have saved the file, but want another directory chosen, naturally, this is where you would do that.
Create in Table - automatically puts table tags around code - you only need to add decoration.
Vertical - Horizontal - this will add HTML Breaks after each image if it's to be displayed vertically, or leave them out if you want to display it on the page horizontally
ASP - if this is chosen, ASP scriipting is used and the down state is used as the sole image, if the name of the page is the name of the destination URL supplied in the boxes below.
Choose Images
Here's where you actually choose the images for each state referred to above - the normal, mouseover and down states. Mouseout is taken care of automatically. Browse to locate the images for each of the states described. Then, enter the HTML Alt attribute, and the Status Bar notation you want.
You do this ONE BUTTON at a time.....you will see buttons on the dialog box with numbers on them. These directly relate to each button you want to add to the Navigational Bar. They MUST be done in order....once you've choosen all the different images and details for the first button, press the '1' button. Then, of course, when you've finished with all the same information for number second button, you press the '2' button.
Once you've completed all buttons in the Nav Bar, then press the 'Apply' button at the bottom.